
Day 27 - Blur
You probably thought this lesson was going to be about bokeh, or background blur again, but this time I'm talking about motion blur. In my post about burst photos, we used that function to stop/freeze the motion and you may wonder why in the world we would want to purposely blur the focus when we've worked so hard to get it sharp. Obviously, this is not something you do to every photo, but it can be very effective to exaggerate motion and create a sense of excitement. I haven't really tried using motion blur before, so I am anxious to to give it a try as well.


Using a slow shutter speed is the best way to capture motion blur when using a DSLR, so using an app such as Camera+ that allows you to slow down the shutter speed (keeps the lens open for a longer period of time) should create the same effect with a phone camera. The key to remember when using a very slow shutter speed is that the camera must be held very steady, so this is a good time to use a small tripod or steady the camera on a stable surface.
Finally, motion blur can be added after a photo is taken using editing apps. iColorama ($2.29) for both iPhones and Androids, has a motion blur option and Focus In Motion ($0.99) which is for iPhones only, is designed specifically for that purpose. I purchased Focus In Motion and tried it out with an old photo I had on my phone. Here is a before/after so you can compare.
BEFORE:
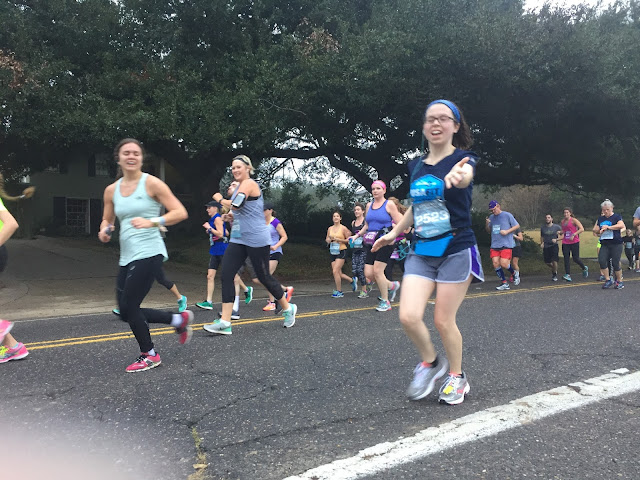
AFTER:

This was pretty fun to play with, but there is definitely a learning curve. There is a "bubble" that you can place over the subject that you want to stay in focus (you can adjust the shape horizontally or vertically). I couldn't seem to get it shaped well for this picture, so I then discovered that there is an option to "paint over" your subject with your finger. This was much more accurate, although I should have used a smaller brush size, as you can see above. Then you press the "Blur" button and choose the direction you want the blur to go. Have fun capturing motion today, even if you have to do it in an editing app.
You probably thought this lesson was going to be about bokeh, or background blur again, but this time I'm talking about motion blur. In my post about burst photos, we used that function to stop/freeze the motion and you may wonder why in the world we would want to purposely blur the focus when we've worked so hard to get it sharp. Obviously, this is not something you do to every photo, but it can be very effective to exaggerate motion and create a sense of excitement. I haven't really tried using motion blur before, so I am anxious to to give it a try as well.

Source: Picsart
Panning is a technique that will allow you to create photos where the subject is fairly clear and the background is blurred by motion. To do it, simply move your camera with your subject. This means that you will actually move your phone itself--if your subject is moving from left to right, your camera will move (or turn) from left to right as well, matching the movement of the subject. Because the shutter speed in your phone camera is fairly slow, your subject should stay in focus, while the background will be blurred, giving the impression of movement.
Source: Picsart
Using a slow shutter speed is the best way to capture motion blur when using a DSLR, so using an app such as Camera+ that allows you to slow down the shutter speed (keeps the lens open for a longer period of time) should create the same effect with a phone camera. The key to remember when using a very slow shutter speed is that the camera must be held very steady, so this is a good time to use a small tripod or steady the camera on a stable surface.
Finally, motion blur can be added after a photo is taken using editing apps. iColorama ($2.29) for both iPhones and Androids, has a motion blur option and Focus In Motion ($0.99) which is for iPhones only, is designed specifically for that purpose. I purchased Focus In Motion and tried it out with an old photo I had on my phone. Here is a before/after so you can compare.
BEFORE:

AFTER:

This was pretty fun to play with, but there is definitely a learning curve. There is a "bubble" that you can place over the subject that you want to stay in focus (you can adjust the shape horizontally or vertically). I couldn't seem to get it shaped well for this picture, so I then discovered that there is an option to "paint over" your subject with your finger. This was much more accurate, although I should have used a smaller brush size, as you can see above. Then you press the "Blur" button and choose the direction you want the blur to go. Have fun capturing motion today, even if you have to do it in an editing app.


Be First to Post Comment !
Post a Comment